Many projects that you will encounter as an interior designer will involve some sort of renovation. This could be as simple changing finishes, but frequently involves more significant demolition. In order to create the "existing," "demo," and "new construction" plans required to communicate these changes to the contractor, you'll need to spend some time with the Phasing panel in the Manage tab (figure 1).
 |
| figure 1 |
Phasing in Revit allows you to assign different project phases to components in your model. Once you have assigned the correct phase, you can control the visibility of each view to show things from unique phases differently (i.e. Demolished walls can be shown as dashed in the demo plan while existing walls with a poche fill). You also have the ability to customize your phases and their visibility settings to show components in a multitude of configurations. This is very helpful when working with complex projects that are being delivered under multiple contracts and/or at different times.
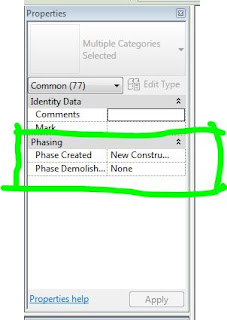
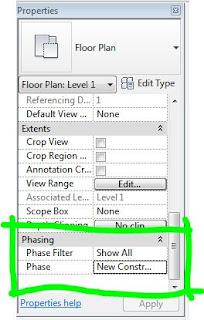
As we explore new options for the level 1 studio space, we'll want to add phase information to our modeled components. Currently everything in our space is "existing." To assign this phase, simply select all of the modeled elements (you'll want to filter out elements like grids and elevation symbols since they cannon assume phase characteristics) and view the Phasing section of the properties menu (figure 2).
 |
| figure 2 |
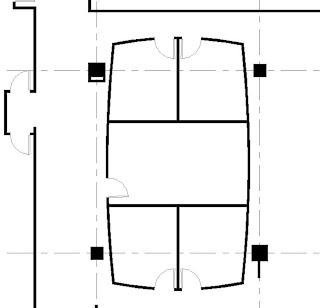
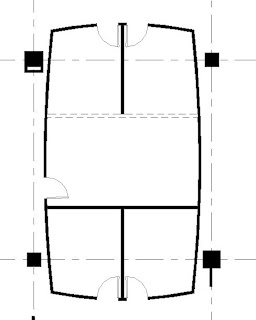
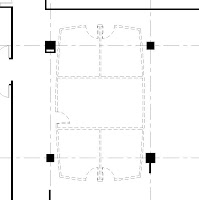
At this point, simply change the drop down menu to the right of "Phase Created from the default, "New Construction" to "Existing." You'll notice after applying that the walls appear differently than they had previously if viewing the Level 1 plan view (figure 3).
 |
| figure 3 |
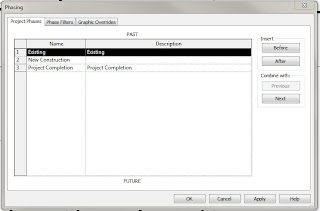
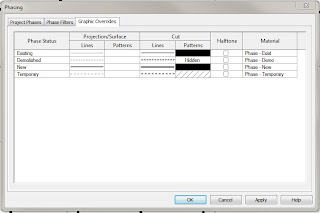
Why the change? If you return to the "Phases" button on the "Phasing" panel of the "Manage" tab, you'll find a menu (figure 4) which shows the default phases, filters, and graphic overrides for the phases. The Graphics Overrides tab (figure 5) allows you to control how differently phased modeled objects will appear in views.
 |
| figure 4 |
 |
| figure 5 |
 |
| figure 6 |
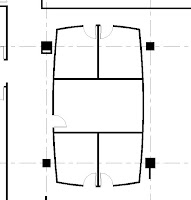
Now, let's say that I want to create demo plan, showing that all of the private office walls are to be removed. An entertaining way to do this is to use the "Demolish" aka the Sledge Hammer and click the walls to be removed. This will change their appearance from filled to dashed. (figure 6). You can also change the phase of an object to demo (or any other phase) by returning to the Phasing section of the object's properties. This occurs because the plan that we are demolishing them in was assigned to the New Construction phase (you can find this in the "Phasing" section of the view properties -- figure 7). This means that the walls were created in the "Existing" phase of the project but demo'd in the "New Construction Phase. If you change the view's "Phase" to something other than "New Construction"it will show the demo'd walls differently (or not at all).
 |
| figure 7 |
By manipulating the "Phase Filter" and the "Phase" of the view. You can change the visibility settings of components in your model to reflect their phase, thus creating the documents necessary to communicate your design intent. For instance, if you choose "Show Complete" for the Phase Filter, the demolished walls will no longer be displayed,, showing how the project will look at delivery.
If you want to see how Revit is determining what is shown in the view's different phase filters, return to the "Phases" menu and look at the "Phase Filters" tab.
Phasing can sometimes be intimidating, and I find the biggest confusion to occur when setting the phase filter for the individual views. Just remember that whatever phase your view is set to, that will be the phase that any new components are drawn on... and also... as with everything in Revit... "get it in and then get it right." You can always change phases of components after they've been drawn from the properties menu.
Below you will find 3 examples of how Phasing is used to show a renovation of the curved private offices to a rectangular configuration. Phasing is not just for plans... I've also included a 3D view showing the demolished walls.
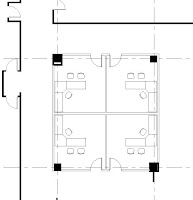 |
| New Construction |
 |
| Existing Plan |
 |
| Demolition Plan |


No comments:
Post a Comment